
Surveys & Forms allow easy creation, distribution, and analysis of surveys or forms across an organization via desktop or mobile. Users can build surveys with various question types, add media, split into pages, and customize settings like anonymity, notifications, and audience targeting. Surveys can be previewed, scheduled, copied, and shared with specific employee segments, supporting multiple submissions and translations in 40+ languages. Configuration and analysis are desktop-only.
Surveys & Forms enables you to easily collect information, feedback, and requests from people across your organization. You can create anything from quick surveys to detailed forms for operational tasks. Once responses are collected, you can review, analyse, and export the data as needed. The feature is designed for both desk-based and frontline teams, helping everyone stay connected and making it easier to capture the information you need to take action.
It's easy to create and release a survey or form to all staff or to particular teams or spaces. Users can submit their responses on web or mobile.
Device(s): Desktop, Mobile (to view and/or submit a Survey)
Roles / Permissions:
- Survey Admin: Can create, manage and view analytics on all surveys and forms across the organization.
- System Admin: Can create, manage and view analytics on all surveys and forms across the organization.
- Survey Manager: Can only manage and view analytics on surveys and forms they have created themselves.
Note: Surveys and forms can only be configured and analysed on desktop.
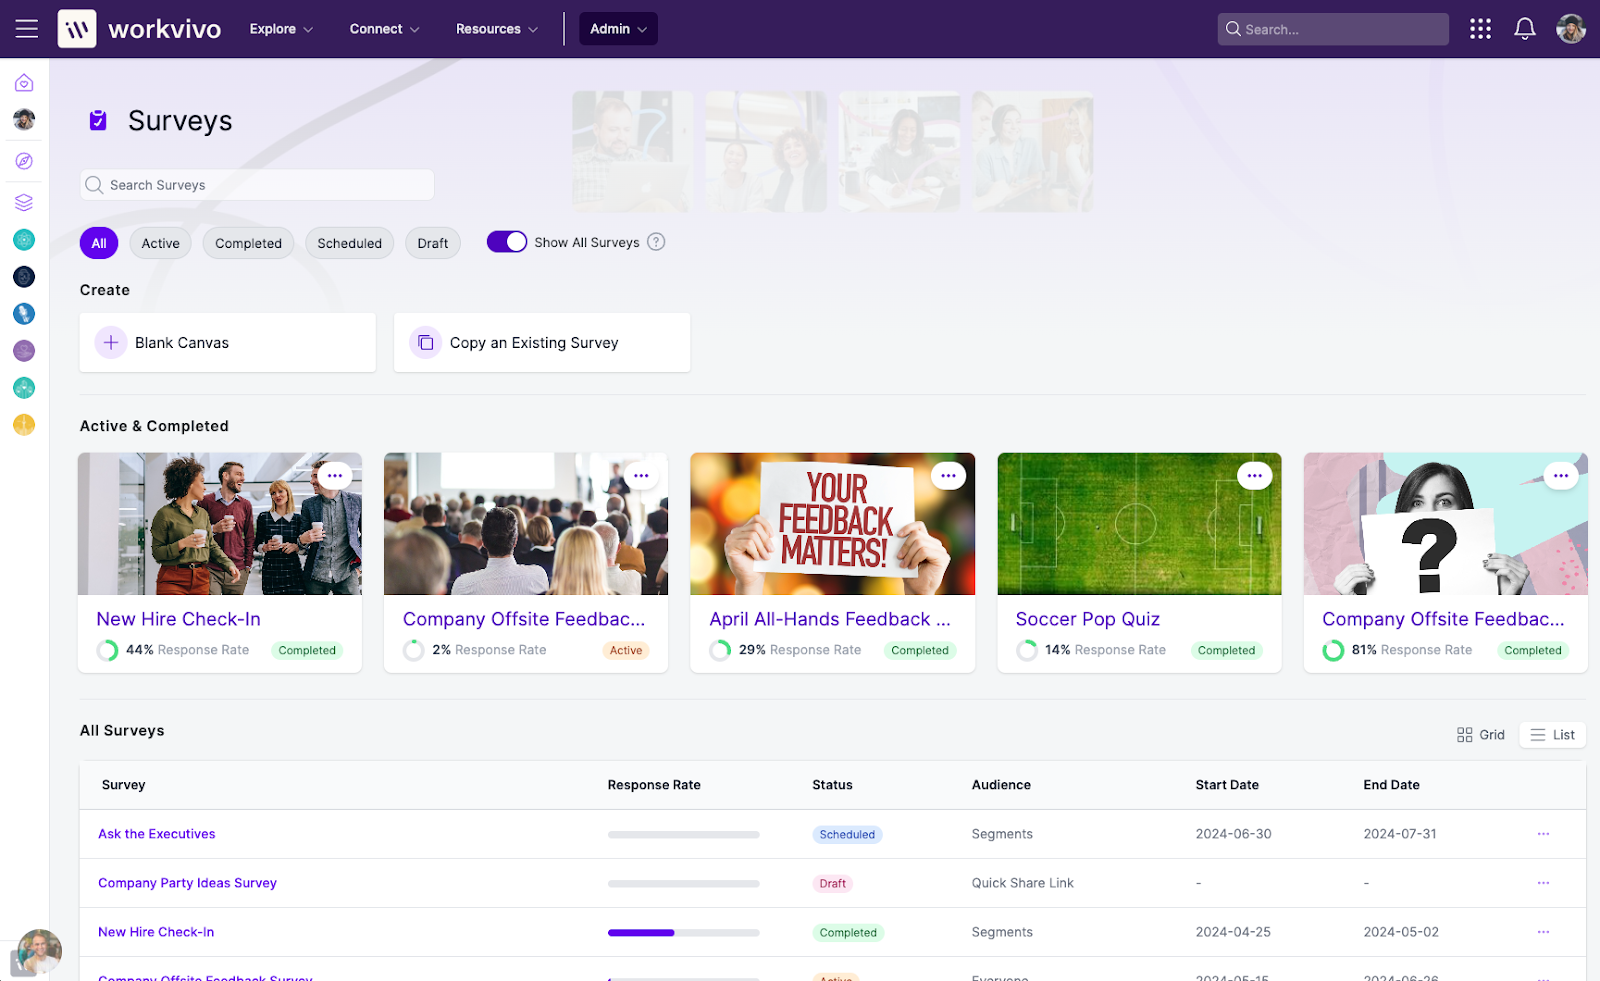
Creating a survey or form
The Create area at the top of the management dashboard is all about building new surveys or forms. Select New if you want to start with a blank canvas, or Copy if you want to copy an existing survey.
There are two main configuration areas for creating a survey or form.
Builder
- This is where you build out the survey or form, creating the questions and selecting the question types you want to include.
Info & Settings
- This is where you configure settings such as notifications, anonymity, display, submission, and more for the survey or form. These settings are essential for tailoring the survey or form to the use case you have.
Builder
When starting from a blank canvas, you will be presented with the empty builder.
You can select from a range of question types, including Short Text, Paragraph, Multiple Choice, Checkbox, Number Line, eNPS, Date and Time, File Upload, Dropdown, Description Field, and Contact Field.
You can add a title, description, and image or video at the top of the builder; and add questions and pages in the area below.
Title, description, and media:
- Cover Image - This will appear on the billboard, if enabled, at the top of the main activity feed. It will also be displayed in the rich preview, if shared in an update. Recommended dimensions: 600px x 300px, image appears in 2:1 ratio.
- Intro Video - This will appear on the intro screen for the survey or form. If you have uploaded both an image and a video, the image will appear as the thumbnail for your video.
- Title - This appears on the billboard, in the rich preview, and in the survey or form itself for the user.
- Description - This appears in the rich preview, and in the survey or form itself for the user.
Adding questions:
-
Question Types
- Short Text: Collect short text responses such as names, job titles, or short answers. Can be configured as a Number Field or Email Field to restrict inputs to specific formats.
- Paragraph: Collect longer, open-ended text responses. Useful for detailed feedback, comments, or explanations.
- Multiple Choice: Provide a list of options where the taker can select one. Ideal for clear, single-answer questions. Optionally, include an Other field to allow custom input.
- Checkbox: Provide a list of options where the taker can select multiple. Useful for questions that allow more than one valid answer. Optionally, include an Other field for additional input.
- Number Line: Create a scale or range (for example, 1–5 or 0–10) where the taker selects a numeric value. Often used for satisfaction or rating questions.
- eNPS: Collect Employee Net Promoter Score (eNPS) responses. The taker selects a score from 0–10 to indicate how likely they are to recommend something.
- Date and Time: Allow the taker to select a specific date, time, or both. Useful for scheduling, availability checks, or timestamped entries.
- Dropdown: Provide a compact list of options that the taker can select from. Ideal for longer lists or when conserving space on the form. Can be set up as single-select or multi-select. Optionally, include an Other field for additional input.
-
File Upload: Enable the taker to attach and upload files as part of their response. Common examples include receipts, images, or supporting documentation.
- File size limited to 100MB per file; up to 10 files can be uploaded in a response.
- Description Field: Add helpful text, context, or instructions within the form or survey. This field is for display only and does not collect responses.
- Contact Field: Leverage your Workvivo directory by letting users select either a person or team from the organisation in a simple dropdown. Can be set up as single-select or multi-select.
- You can select a question type from the question bank on the left or click Add Question from directly within the builder.
- Fill in your question text, add a cover image if appropriate, and easily toggle between our range of question types as shown below.
- Marking a question as Required will mean survey participants cannot progress past the question without providing an answer.
- You can also duplicate and delete questions; and reorder questions with a simple drag and drop action.
Splitting your survey or form into pages:
- You can add pages by clicking Add Page at the bottom of the builder, allowing you to spread your questions across each page.
- This is particularly useful for form use cases where all questions appear on one page in a scrollable layout. You may want to group questions into different themes or categories per page with this setup.
- In the example below, Question 1 will appear on the first page of the survey or form and Question 2 will appear on the second page.

Previewing the survey or form
Make sure you’re happy with the look and feel before scheduling or publishing the survey or form. Click Preview in the top right corner at any time to open a fully interactive preview for review and testing.
Info & Settings
When you are ready to complete the final stages of the setup, like selecting sharing preferences, configuring submission settings, and customizing advanced settings, go to the Info & Settings tab.
Sharing your survey or form:
-
You have two options for sharing your survey or form:
- Audience - Target a specific group of users within Workvivo. You can then select whether the users will receive notifications and if a billboard will be created to promote the survey or form in that audience's feed. You can also share the link provided through other channels like articles, updates, or QR code and only members of your target audience can take the survey or form using this link.
- Quick Share - Quickly share your survey or form via link only. Users will not be notified and the billboard will not appear at the top of the feed. All of your users with a Workvivo account can take the survey using this link.
-
Choosing your audience:
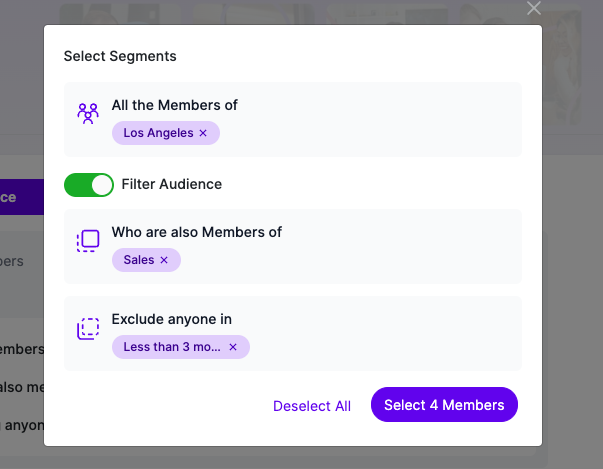
- Click Select Segments to begin picking specific employee segments to target. (Note: Segments are groups of employees within Workvivo)
- From here, click All the Members of to choose your main audience. You can opt for a global audience by selecting Everyone, or make your survey or form more targeted by choosing specific employee segments like Spaces, Age brackets, Tenure brackets or Teams. You can select multiple segments at once. In this case, we have chosen the Los Angeles team as our audience.
-
- Our optional Filter Audience toggle allows you to apply additional logic to your audience targeting.
- In the example shown here, the survey will go out to anyone based in Los Angeles, who is also a member of the sales team, excluding anyone who has been in the company less than 3 months.
- Note: Hidden Spaces can't be selected as an audience
- Optionally, you can disable both the notifications, and the post to the billboard. These are enabled by default.
Additional Settings:
-
Anonymisation - Choose whether responses should be anonymous or not. Participants will be informed whether the survey or form is anonymous on the introduction screen.
- Anonymisation settings impact what data and reporting is available for analysis and export.
- Format - Choose how your survey or form will be displayed for takers. You can select One question at a time for a step-by-step approach, or Show all questions for a scrollable view of all questions on each page.
- Confirmation Screen - Fill in your confirmation screen title, message and enable or disable the fireworks animation.
- Time to complete - Option to display an estimated completion time for takers before they begin their response.
- Allow Multiple Submissions - Option to enable multiple responses from the same user. Each time the user submits their response, a new record is created. Useful for long-living, multi-submission forms and surveys.
- Response Saving - Select whether responses are saved incrementally as the user progresses between questions, or once the survey is actually submitted.
- Translations - Add optional translations for your title, description, questions and confirmation screen. You can translate into 40+ languages. See here for our complete list of supported languages.
Scheduling and Saving:
- Saving as Draft - Click Save as Draft at any point during creation to save your work and come back later.
- Scheduling - When you click Schedule at the bottom of the screen you will be presented with the modal shown below. You can opt to Publish Now if you want to publish immediately, or you can choose a Start Date/Time in the future. In both cases you must enter an End Date/Time, after which users will no longer be able to access the survey or form.
Copying an Existing Survey or Form
If you want to save time by copying an existing item, click Copy at the top of the management dashboard. You will then be presented with your list of surveys and forms to choose from. The builder will open pre-populated with all of the questions and settings from the copied item. You can then edit and update as required.
Top tip: You can also copy a survey or form directly from the Management Dashboard.